Monday, 21 May 2012
Showreel
For my Showreel I originally wanted to use After Effects, but unfortunately due to my lack of knowledge with the software, it became very difficult to make the video look good. I decided to use Windows Movie Maker, as although it is basic, it can produce very nice effects. I wanted my video to showcase all my 3D work dynamically, so I made a fading slide transfer across all the images. I also added a pan like animation to the slides, that scanned the images horizontal, vertical and even zoom. The fading of the slides and panning of the camera makes the whole video come together nicely, especially with the inclusion of atmospheric music.
I added small captions to the slides to title briefly what image was being represented. Also at the end of the video, I briefly added the software I used to inform the viewer how the models were built.
Overall I was very pleased with the outcome of my Showreel, as although it was simple, I believe it was effective and represented my work in a clear and professional manner
Making My Website
After looking at some existing examples, I have a good idea of what I wanted my website to look like. I decide to make it on Wix, a website that specializes on web design. Although it seemed a little complex at first, I really wanted to take my time and produce my website in the simplistic and interactive way I envisioned. Sadly, due to branding, Wix used a few adverts on my site, but I wasn't so put off by it when I finalized the design process.
Here are some screenshot images of my website. It is designed into 4 simple parts. Home page. About me. Art. and Contact.

For my main homepage I wanted it to be able to instantly grab the attention of my audience. So I added an animated slideshow of my recently modeled work. Below that I also added a small 'Like' button connected to Facebook, which would hopefully encourage users to use. Below the main slideshow box, I added another small image showcasing a different 3D model that is not including in the slideshow above. This instantly shows the diversity of my work all in one place. The viewer can access my art page by simply clicking 'more info' Below that I added another place for Facebook users to comment on the work presented.

For my 'About Me' section, I really wanted to show a down to earth profile about who I am and what I enjoy, so it would be easy for the viewer to understand me better as a person, not just an artist.


Here are some screenshot images of my website. It is designed into 4 simple parts. Home page. About me. Art. and Contact.


My 'Art' page I wanted to be entirely visual with no text. I also wanted to show case all the 3D work I have done in reasonably large thumbnail views, that can be enlarged when clicked. This grid of pictures makes it easy for the viewer to briefly look over at my work and be freely able to select which images they wish to enlarge.

The Final page is the 'Contact me' section. Where viewers are freely able to email me directly with any questions or queries to my work on the site. I also added two interactive social network buttons to the bottom, to allow viewers to contact me in those methods also. Considering a lot of artists are connected through social networking, I found it important to use this a s a key asset.
Making a Website: Existing Examples.
For part of my Uni project I was asked to make a website to showcase my directed study. The skills I want portray are that of my 3D work. Although I enjoy doing 2D artwork, I have grown very fond of 3D modeling and think I have a more natural ability with it. To showcase my 3D work I want to make my website simplistic, yet visually appealing and interactive. I want to make it friendly and inviting so that viewers will be encouraged to look further. With interactive images of my work, such as slideshows and animated button links, my website will look simplistic but professional for the work shown. I also think it is important to add social networking to the site, so it is easily encouraged for viewers to want to like or share my work.
To get a better perspective of what I want my website to look like, I researched some existing artistic examples that showcase the simplicity and the social network aspect.

Alessandro Cavallo's website is very simplistic and easy to navigate around. The bright use of colour and simple text makes it a visually appealing site. The little doodles also add the comical factor which can make enough indication to the artist's work.

This is the emotionslive website. I chose this because I really loved the simplicity of what is actually displayed. Although there is little to physically see, there is a lot of information you can take on board primarily to it's aesthetic. For example the coloured legs relate well to the title of the website. Emotions are recognized with colour. So I think this website works well with what it's saying.

Guilherme Neumann's website is the most simplistic of them all in terms of written details. Instead of describing his work or himself, he presents the viewer with 5 options or interactive windows. Instantly inviting the viewer into this world of art.
Final Piece: Gun Showreel
Here is my final piece of this project: A short show reel of my 3D models. I wanted to do something animated to show off my models because making show reels is a professional way to showcase your work. Although I am not especially good at making videos, I did however find it simple, but not too simple to make it look unprofessional. I added music on the basic to add to that sort of futuristic or robotic feel. With weapons being machinery, I thought it was ideal. Overall I am really pleased with the outcome : )
Sunday, 20 May 2012
Thompson Rifle Render
Modeling the Thompson was actually quite complex due to the visible chamber. However, I thoroughly like building the details such as safety switch and dial. The Thompson is also a WW2 American rifle, I decided to do that alongside the constructing of MP40 to show diversity in culture in the same time period.

Here is a photograph of an actual Thompson Rifle

Here is my model of the Thompson rifle.
Sawn off Shotgun Render
I really enjoyed building the Sawn off shotgun on the basis of it's simplistic yet beautiful aesthetic. Older models of shotgun have specialist detailing which I decide to add to my model. I added a gold material effect which added really nice affects.
.jpg)
Here is a real photograph of a Sawn off Shotgun

Here is my model of the Sawn off Shotgun
MP40 Rifle Render
I really enjoyed modeling the MP40 primarily because of it's unusual shapes and details. I also wanted to add the diversity of culture and history within my models. This is the German military issue rifle of WW2. It was one of the more complex models to construct based around it's unusual details and sizes.

Actual photograph of the MP40 Rifle

My model of the MP40 Rifle
M1911 Pistol Render
Here is my model of the M1911 pistol. This was the easiest of the guns to model on the basis of it's size. However, the contours of the barrel were quite complex to work around with the use of manipulating vertexes. I really like the wood effect of the handle too!

Actual photograph of the M1911 Pistol.

My Model of the M1911 Pistol
M24 Rifle Render
Here is my model for the M24 Sniper rifle. I really enjoyed modeling this for the details on the scope itself. Although the actual shape of the sniper is simplistic, the scope really adds that nice touch of detail to the model. I also really liked adding the wood material to the sniper base, I think it really makes it look realistic.

Here is a photograph of an actual M24

Here are two views of my M24 Model

G36C Rifle Render
Here is my final rendered image of the G36C Assault Rifle. I chose this gun for it's complexity as I wanted to push my skills. I also wanted to make sure I made a diverse range of weapons.

Here is an actual photograph of the G36C

Here is my G36C Model
Rendering using Cinema 4D Part 2
Now I have made my studio and have the lighting set up. It's time to bring my models in apply some colour and render them. I decided to apply materials to my guns via Cinema 4D on the basis of the wide variety to choose from.
Here are the images showing how I imported the models, how I applied materials to them and how I rendered them out into high definition images.

Firstly I went to File, merge then opened the OBJ export of my model from Maya.

Once the model is imported, I check to make sure all the components of the gun were there for adding materials too. You can see this in the top right hand corner.

I then went to the file tab on the material editor and chose 'new material' as a basis to begin applying colour to my gun.
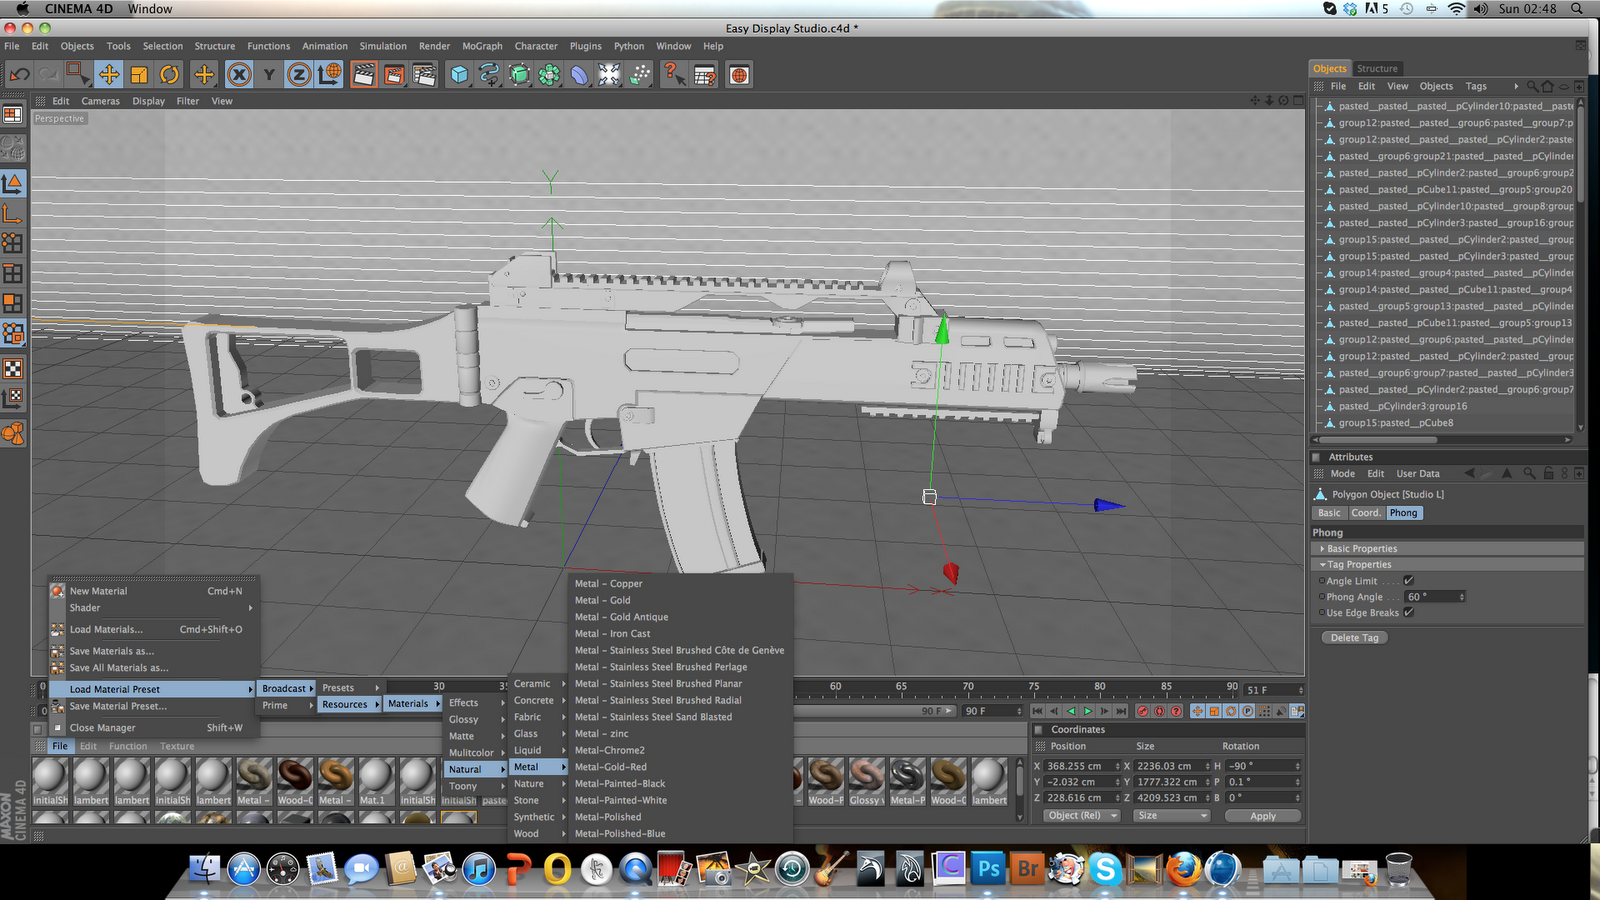
I then went to apply a material and looked into the different types I could choose from. For this specific gun I want two types of polished metal, as this gun is modern. A dark gun metal for the main parts of the weapon and a shinier, polished metal for the details, like screws etc.

Here is the Gun metal material ready for application.

Here is the polished metal for the details.

Although my cursor can sadly not be seen here, I have highlighted the weapon and dragged the material on to it.

Here is the gun with the new material applied.

Here is a view without the grid mesh visible.

I then began dragging the polished material to the separate details.

I wanted to add the polished metal to the inner chamber. However, without it being a separate object, I had to select it separately.

Using the select faces tool, I highlighted the inside faces of the chamber.

From the selected faces I was able to add the polished metal to only that section. This image shows the change in material between both the main gun and the chamber.

Here is the gun with all materials added in the correct places, ready for rendering!

I then went to the render settings menu where I changed the pixel ratio to 1280x720. I also made it HD ready so that the image comes out big and crystal clear.

I then selected the save option where I could choose the location and the file format of the image.

I also checked that 'Global Illumination' was turned on so that the lighting will be taken into account properly with the render.

To then render the image out, I went back to the render tab and selected 'Render with Picture Viewer'

Here is my model rendering in the picture viewer using the Global Illumination setting.

Finally! my gun has been render, showing off the materials and lighting beautifully and as I wanted to.

To save the image, I clicked 'File' on the Picture view and selected 'Save as'

I then checked the settings I had made earlier.

Named the file then saved it!
Overall, although my knowledge of Cinema 4D is yet to improve, I really enjoyed working with the software. Having modeled things before, I never though they were capable of looking so nice through a different programme. Learning the settings for light set ups and studios will take some practice, but I think I did pretty okay considering the time frame I had to get a basic grip of it.
Rendering using Cinema 4D Part 1
Although I really enjoy modeling in Maya, I wanted to try a nice piece of software to render my completed models. I have seen many renders of models in a programme called Cinema 4D and have fallen in love with how beautiful the outcome is. However, it being a nice piece of software, I had to learn correctly how to make a set up with good enough lighting that would show off my models in the way I want them to look. I had some help off a tutor at University who is familiar with the production of lighting and set ups when rendering in Cinema. The tutor made me a mock set up to use, but I want to be able to make my own in order to learn the software.

I began with a basic plane to put my models on. I then added a 'Sky' lighting affect. This illuminates the surrounding plane with a broad spectrum of light.

This is the studio plane set up.

In this corner we can see the different materials used to produce the effects. From the lighting to the texture on the plane.

When you double click on a material it opens up an render editor in which you can play around with the settings of your materials. Making them have specific attitudes that can be applied to the render of the scene.

For the sky lighting, a HDRI image is placed over a material checking only the luminance box so that the lighting from the image can be reflected onto the model when rendering.

Here is where the texture or material HDRI file is applied.

You can also select different materials by clicking on the tab in the bottom left corner. From there a wide selection of materials can be implemented for the best effects.

Although It cannot be seen, in this image. When you click on a material, you can drag it to a design surface. For the HDRI material, I applied it to the sky lighting for the rendering process.

Subscribe to:
Posts (Atom)